
Personal Tutor
How can I manage the Personal Tutor email notifications (MS Outlook only)?
As a personal tutor you may receive many emails from many different students and would like a way to manage them. This page describes a way to do this in MS Outlook only, other email clients may not have the same functions.
You can test these rules with your colleagues as anything you set up can easily be changed or deleted.
If you find you are getting several email notifications a day you may want to automatically put them into a folder, so that you can get to them all when there are a certain number of notifications waiting or at a suitable time for you in the day rather than taking action on each one as it comes. Setting up an MS Outlook rule will enable you to do this easily.
- First of all you need to create a folder in Outlook - press the F1 key in Outlook and search for Create a folder for help on how to do this if you’re not already familiar. We have set up an example folder for named PT Notifications
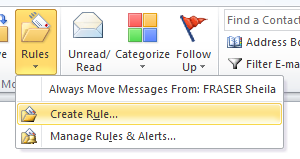
- Go to the ribbon in Outlook

Select the dropdown on the Rules icon
- Select Manage Rules and Alerts option
and the Rules and Alerts box opens. Ensure you are on the Email rules tab.
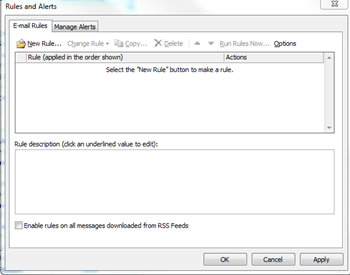
- Select New rule button
 on the toolbar
 - This opens the Rules Wizard box. From this Rules Wizard box you can apply many different rules. For this activity we are just going to move messages received from the automatic notification to the folder you created for them in step 1.
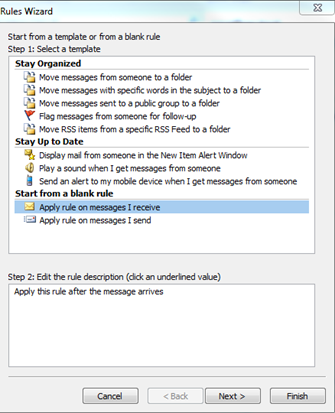
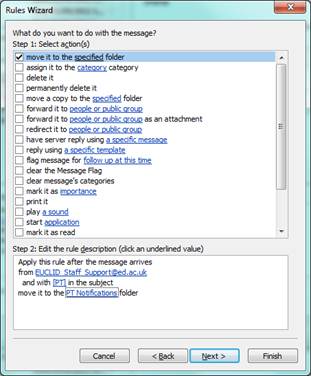
- Select Apply rule on messages I receive under Start from a blank rule. Select Next to take you to the conditions you want to set
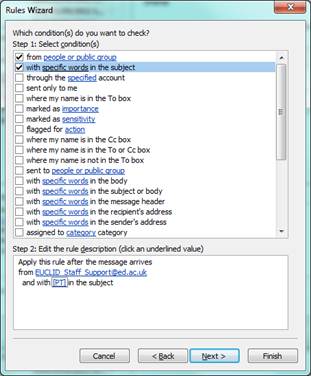
- In the conditions screen select from people or public group and with specific words in the subject.
- In the lower box select the underlined text from people or group and enter EUCLID_Staff_Support@ed.ac.uk in the From box at the bottom then select OK
- In the lower box select the underlined text specific words in the subject and enter [PT] then select Add and OK
- Select Next and select move it to the specified folder
- In the lower box select the underlined text specified folder and browse through your email folders to get to your new folder. Select OK
- Select Next and add any exception conditions here – normally there will be none, but you may want to add an exception if you have one. Press Next to be taken to Finish rule setup
- Add a name for the rule, e.g.’ Move Personal Tutor emails to the PT notifications folder’ and make sure that ‘Turn on this rule’ is checked. If you want to run the rule on existing messages to forward them then check the box ‘Run this rule now on messages already in Inbox’ and select Finish
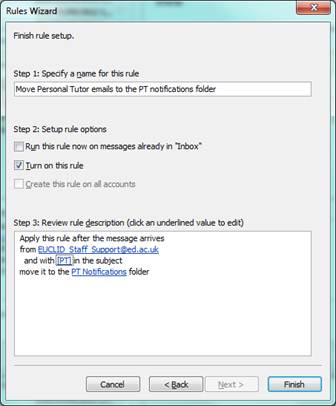
- You will return to the Rules and Alerts where you can see the rule in the Rules list, and you will be able to change it again if you need to (e.g. if you want to put it in a different folder).
- When emails come in from the Personal Tutor system email address with [PT] in the subject they will now be automatically moved to your chosen folder. You will be able to see how many unread notifications you have by looking at your chosen folder. If there are unread emails the folder name will be shown in bold, and the number of unread emails will be shown in brackets, e.g.
 If there are no new notifications the folder name will not be bold and no number will be shown e.g.
  .
. - You can use this to manage the email notifications, and act when a certain number is reached, or when you have suitable time during the day to review and take action.